

If you ever find yourself stranded on an island or out in the wilderness with no fresh drinking water, knowing how to create drinkable water can mean the difference between life and death.
Why you shouldn’t drink saltwater
Drinking seawater straight is a bad idea because your body must expel the salt by urinating more water than it actually gains. Seawater contains roughly 130 grams of salt per gallon. Desalination can reduce salt levels to below 2 grams per gallon, which is the limit for safe human consumption.
So, if you’re guzzling seawater, you actually aren’t taking in any water but are incurring a net loss, leading to depleted body fluids, muscle cramps, dry mouth, and yes, thirst.
The body tries to compensate for fluid loss by increasing the heart rate and constricting blood vessels to maintain blood pressure and flow to vital organs. You’re also most likely to feel nausea, weakness and even delirium. As you become more dehydrated, the coping mechanism fails. If you still don’t drink any water to reverse the effects of excess sodium, the brain and other organs receive less blood, leading to coma, organ failure and eventually death.
Staying alive when fresh water isn’t available
Before we delve into methods for creating drinkable water out of saltwater here are a few tips to help you survive this crisis:
- Don’t drink seawater (it will only make you thirstier).
- Conserve sweat not water (relax and sleep as much as possible).
- Don’t eat unless you know you have water available.
- Make good use of your freshwater.
- Collect rainwater in containers or anything you can find.
- Collect dew at night or when it’s foggy.
- Use solar stills as well if you can. (see below for DIY instructions)
- Blue ice is safe to melt and drink.
- Suck the bones of fish and eyes (they contain water).
- Improvise with the tools you have available to you.
Plastic bottle condensation method
This is the simplest method, and if you are on a beach you are quite likely to find things washed on shore that you can use for this method.
Materials you will need:
1. Cutting tool
2. Large plastic bottle with lid (must have a lid to work)
3. Soda can or a plastic bottle that is smaller than your large plastic bottle
Step 1: Cut the bottom 1-2″ of the large plastic bottle (clear is best)
Step 2: Roll the bottom 3-4 inches of the water bottle inside the bottle to create a “gutter” that is at least 3 inches tall.
Step 3: Cut the top off the standard soda can or small plastic bottle so it looks like a drinking glass.
Step 4: Fill the soda can/small bottle with seawater and set the larger bottle over it.
Step 5: Place the contraption in the full sun, being careful not to splash any seawater into the gutter you created on the larger bottle.
Step 6: Let condensation build-up and run down into the gutter until it is almost full. Carefully remove the larger bottle, uncap and drink or pour into another container to store for later.
Step 7: Repeat the above steps as the amount you get will only give you a few ounces at best.
This system is quick and simple and requires very little expenditure of energy on your part to accomplish. If you have the materials, it is wise to create multiples in order to harvest more water.
“Solar Still” – for desert or beach
This method sometimes has higher yields than using the bottle method described above, however, it does take a little more energy to build. However, it is good to know multiple methods to take the best advantage of materials you may have on hand.
Materials you will need:
1. container to hold water – best it if has a wide mouth
2. digging tool of some sort – even your bare hands
3. large sheet of clear plastic, but in a pinch, any large waterproof item such as a sail will work – it just won’t be as efficient.
4. length of plastic tube and tape are optional
The Steps for Construction:
- Dig a pit that is about 4 feet wide and 3 feet deep
- You can either dig an additional pit to place your container in, or you can make your pit look a but like a bundt cake pan with the center raised up a bit to hold your container. This helps keep leaves or seawater out of your collection container, especially if is small. If you have a larger bucket, you may not need to do this.
- If using a plastic tube, run the tubing from the container to the outside of the pit. Tape can be used to secure the tube inside the container
- If loose green vegetation is available, place the leaves inside the pit but do not obstruct the container. This will add moisture to the distillation process. If you are located next to seawater, than skip the leaves and add saltwater to the bottom of your pit. If you are digging in sand near the shoreline, you may hit saltwater naturally just a few feet down so there is no need to add more.
- Cover the pit with the plastic sheet, but don’t let it touch the bottom of the pit. Anchor the corners with rocks to prevent it from flying off
- Place a small rock in the center of the sheet, just above the water container. Push down the weight gently until the sides slope to an angle of 45o.
- Secure the edges of the plastic sheet with rocks and dirt to prevent the escape of moisture.
- Close the tubing end with a knot or tie it closed, if used. Only open it to take a drink.
- Wait 24-48 hours. Do not open the plastic sheet or the moisture will escape.
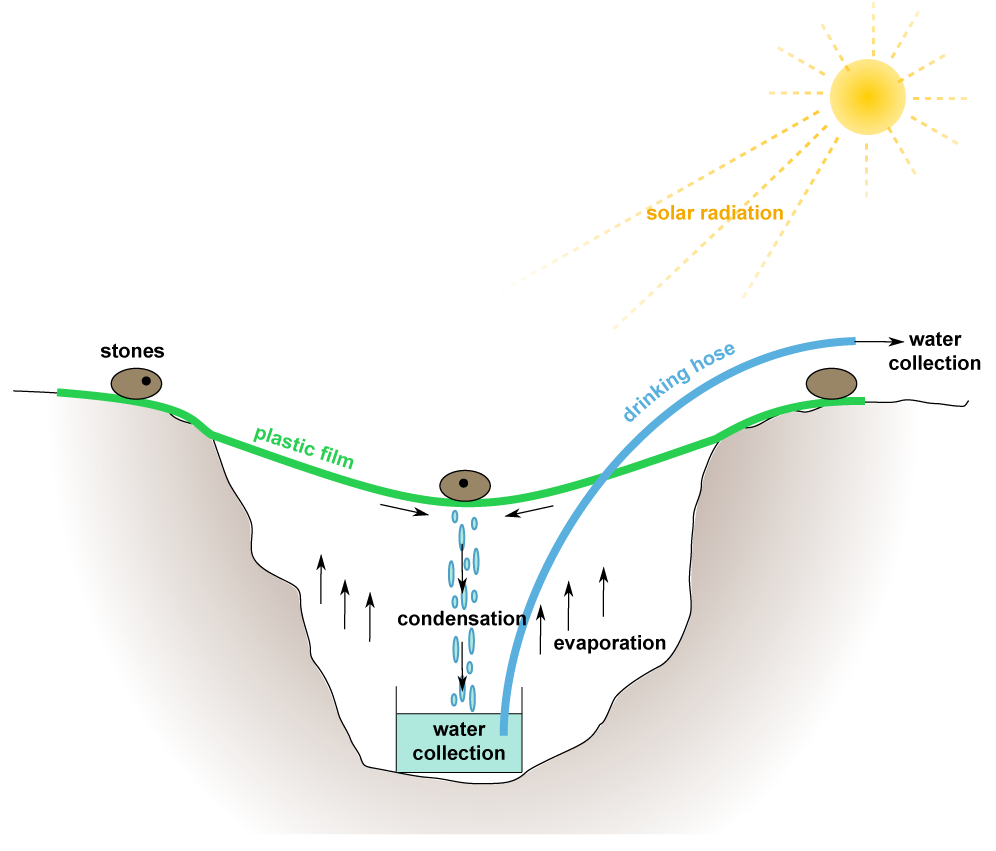
Within two hours (depending on outside temperatures), the air inside the still will become saturated with moisture and begin to condense onto the underside of the plastic sheeting. Because of the angle of the plastic, water will run down towards the center. Finally, drops will gather and fall from the apex down into the water container. As the container fills, simply sip fresh, sterile water from the plastic tubing.
Steam collection method
Using the power of the sun to distill water for drinking is a low energy option, but what if the sun isn’t cooperating? You can create the same effect using fire as a heat source, but of course, that does require more energy to gather firewood.
Materials needed:
1. Container to boil water in
2. Container to catch steam condensation in
2. Ability to make a hot fire
There are several ways of going about this, it can be as simple as using two glass bottles with matching mouth sizes as shown in the video below, or it can involve a large metal container for boiling that has a lid and means to collect the steam into the final container such as is shown in this video clip from First Man Out.
Either way, you need your seawater to reach boiling, and the container to catch the steam to be cooler so that the steam will condense into the freshwater container.
The following video from NightHawnkinLight gives an excellent explanation of the two bottle method, including how to accomplish the objective using only the two bottles without a rocket stove.
Get access to premium content and more!

